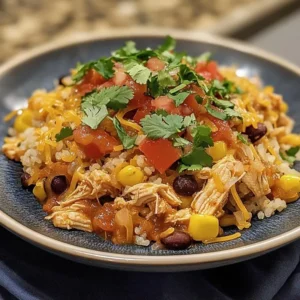
The first time I made this Weeknight Beef Taco Skillet, it was one of those evenings where the fridge looked completely hopeless. You know the kind — it’s 5:45 PM, everyone’s already asking what’s for dinner, and you’re standing there holding a pound of ground beef wondering if cereal is an acceptable option. I had a can of diced tomatoes, some taco seasoning, a half-used bag of rice, and a block of cheddar cheese with about three days of life left in it. Twenty-eight minutes later, my family was scraping the skillet clean and my husband was asking if I’d gotten takeout. I hadn’t. And that’s the magic of this dish.

- 1 lb ground beef (80/20)
- 1 small yellow onion, diced
- 3 cloves garlic, minced
- 1 packet (2 tablespoons) taco seasoning
- 1 cup long-grain white rice, uncooked
- 1 can (14.5 oz) diced tomatoes with green chiles (such as Rotel), undrained
- 1 3/4 cups low-sodium chicken broth
- 1 can (15 oz) black beans, drained and rinsed
- 1 cup frozen corn (no need to thaw)
- 1 1/2 cups shredded Mexican blend cheese or sharp cheddar
- Salt and black pepper to taste
- Optional for serving: sour cream, sliced jalapeños, fresh cilantro, avocado or guacamole, lime wedges, tortilla chips, salsa
- Heat a large, deep 12-inch skillet over medium-high heat. No oil is needed when using 80/20 ground beef.
- Add the ground beef to the hot skillet. Break it up with a wooden spoon or meat chopper and cook until no pink remains, about 5–7 minutes. Season with a pinch of salt and pepper as it cooks. Aim for good browning on the meat — that caramelization builds deep flavor.
- Tilt the pan and carefully spoon off most of the excess rendered fat, leaving just a thin coat in the pan.
- Add the diced onion to the skillet and stir it into the beef. Cook for about 3 minutes, stirring occasionally, until the onion turns translucent and fragrant.
- Stir in the minced garlic and taco seasoning. Cook for 60 seconds, stirring constantly, to bloom the spices in the fat.
- Pour the dry, uncooked rice directly into the seasoned beef mixture and stir well to coat it in the spices and drippings. Toast the rice for about 1 minute, stirring, until it smells slightly nutty.
- Add the undrained can of diced tomatoes with green chiles and the chicken broth. Stir everything together, scraping up any browned bits from the bottom of the pan. Bring the mixture to a boil over medium-high heat.
- Stir in the drained black beans and frozen corn. Once the mixture returns to a boil, reduce the heat to medium-low, place a tight-fitting lid on the skillet, and simmer for 18–20 minutes. Do not lift the lid during this time — escaping steam will slow the rice cooking.
- After 18 minutes, lift the lid and check that the rice is tender and has absorbed most of the liquid. If the rice is still slightly firm, add about 1/4 cup additional broth, re-cover, and cook for another 3–5 minutes.
- Sprinkle the shredded cheese evenly over the top of the skillet. Replace the lid for 2–3 minutes, or until the cheese is fully melted and bubbly.
- Serve directly from the skillet with your choice of toppings: sour cream, jalapeños, cilantro, avocado, lime wedges, tortilla chips, or salsa.
What I love most about this recipe — and why it’s firmly in our weeknight dinner rotation — is that it delivers every single taco craving in one bubbling, cheesy, deeply satisfying pan. You get the seasoned beef. You get the tomatoes and the corn. You get melted cheese stretching across the top like a blanket. And it all comes together without a stack of dishes, without a complicated technique, and without a grocery run that breaks the budget. It smells incredible while it cooks — like your favorite taco night, but somehow cozier. The cumin and chili powder start to bloom in the hot pan, the beef goes in and sizzles, and then everything just melts together into something that tastes like it took way more effort than it did.
This is the kind of dinner that works every time. It’s perfect for a Tuesday when everyone’s tired, for a Friday when you don’t want to think, and honestly even for casual company when you want something crowd-pleasing and unpretentious. If you’re a fan of easy one-pan meals, you might also love my cheesy ground turkey zucchini skillet, which uses a lot of the same pantry staples. But today, we’re all about this beefy, taco-seasoned, gloriously cheesy skillet. Let’s get into it.
Why You’ll Love This Weeknight Beef Taco Skillet
- It’s done in 30 minutes flat. From cold pan to dinner table, this recipe moves fast. No waiting, no babysitting, no guesswork.
- One skillet, minimal cleanup. Everything — the browning, the simmering, the melting — happens in a single pan. You’ll have energy left after dinner. Imagine that.
- Budget-friendly ingredients. Ground beef, canned tomatoes, rice, beans, frozen corn, and shredded cheese. Nothing here will shock you at checkout.
- Kid-approved and endlessly customizable. The base recipe is mild enough for picky eaters, and you can load on the toppings — jalapeños, sour cream, hot sauce — for the adults who want more heat.
- It tastes like taco night, but better. All the bold, smoky, cheesy taco flavors you love, combined into one comforting skillet dish. No assembling required.
What You’ll Need
This recipe is built around pantry staples and simple fresh ingredients. Here’s what you’ll need, plus a few notes on why each component matters and what you can swap if needed.
- 1 lb ground beef (80/20): The fat content in 80/20 ground beef gives you flavor and keeps things juicy. You can use 90/10 if that’s what you have, but add a small drizzle of olive oil to the pan so things don’t stick. Ground turkey or ground chicken also works great here — if you go that route, check out my easy ground turkey taco rice bowl for seasoning tips that specifically suit the lighter meat.
- 1 small yellow onion, diced: Don’t skip this. Onion cooked down in the beef drippings adds a savory base that makes everything taste more layered and complex.
- 3 cloves garlic, minced: Fresh garlic every time, please. It makes a real difference here.
- 1 packet (or 2 tablespoons) taco seasoning: A store-bought packet works perfectly. If you prefer homemade taco seasoning, use about 2 tablespoons — I like a blend of chili powder, cumin, garlic powder, onion powder, smoked paprika, and a pinch of cayenne.
- 1 can (14.5 oz) diced tomatoes with green chiles (like Rotel): Do not drain these. The liquid is part of what cooks the rice. If you want a milder flavor, use plain diced tomatoes instead.
- 1 can (15 oz) black beans, drained and rinsed: Pinto beans work just as well if that’s what’s in the cabinet.
- 1 cup frozen corn: Straight from frozen — no need to thaw. It warms right up in the skillet.
- 1 cup long-grain white rice (uncooked): This is what makes the dish a complete meal. The rice cooks directly in the skillet, absorbing all that seasoned liquid. Use long-grain for best results — instant rice will turn mushy and regular brown rice needs more liquid and time.
- 1 ¾ cups chicken broth: Broth adds more depth than plain water. Low-sodium is perfect so you can control the saltiness yourself.
- 1 ½ cups shredded Mexican blend cheese (or sharp cheddar): Pre-shredded is convenient, but block cheese that you grate yourself will melt smoother and taste richer. Either works.
- Salt and black pepper to taste
- For serving: Sour cream, sliced jalapeños, fresh cilantro, avocado or guacamole, lime wedges, tortilla chips, salsa — go wild.
How to Make Weeknight Beef Taco Skillet
This recipe is practically foolproof, but I’ve packed in every tip and trick I’ve learned from making it probably forty-plus times at this point. Follow these steps and you’ll have a perfect skillet every single time.
- Heat your skillet over medium-high heat. Use a large, deep skillet — at least 12 inches and ideally with a lid. A cast iron skillet works beautifully here, as does a deep stainless or nonstick pan. You want plenty of room for the rice to expand and for everything to stir together without spilling over the sides.
- Brown the ground beef. Add the ground beef to the dry, hot skillet (no oil needed with 80/20 beef — there’s enough fat). Break it up with a wooden spoon or meat chopper and cook until no pink remains, about 5–7 minutes. Season with a pinch of salt and pepper as it cooks. Don’t rush this step — you want some good browning on the meat, not just gray steaming. That caramelization is flavor.
- Drain the excess fat. Tilt the pan and spoon off most of the rendered fat, leaving just a thin coat in the pan. This keeps the dish from being greasy without sacrificing flavor entirely.
- Add the onion and cook until softened. Toss in your diced onion and stir it into the beef. Cook for about 3 minutes, stirring occasionally, until the onion turns translucent and starts to smell sweet. This is the point in the recipe where your kitchen starts smelling absolutely amazing.
- Add the garlic and taco seasoning. Stir in the minced garlic and taco seasoning. Cook for 60 seconds, stirring constantly. This step blooms the spices in the fat, which makes the flavor go from good to great. Don’t skip it — one minute in a hot pan wakes up all those dried spices in a way that just dumping them into liquid never will.
- Add the uncooked rice and stir to coat. Pour the dry rice directly into the seasoned beef mixture and stir well, letting the rice get coated in all those spices and drippings. Toast it for about 1 minute. It’ll smell a little nutty and wonderful.
- Pour in the tomatoes and broth. Add the can of Rotel (liquid and all), the chicken broth, and stir everything together. Scrape up any bits stuck to the bottom of the pan — those are gold. Bring the mixture to a boil over medium-high heat.
- Add the beans and corn, then cover and simmer. Stir in the black beans and frozen corn. Once the mixture is boiling, reduce the heat to medium-low, cover the skillet with a tight-fitting lid, and let it simmer for 18–20 minutes. Do not lift the lid. I know it’s tempting. But every time you peek, steam escapes and the rice takes longer to cook. Set a timer and trust the process.
- Check the rice. After 18 minutes, lift the lid and check that the rice is tender and has absorbed most of the liquid. If the rice still feels slightly firm, add a splash of broth (about ¼ cup), re-cover, and cook for another 3–5 minutes. If there’s a little liquid still pooled at the edges, that’s fine — it’ll absorb as everything rests.
- Add the cheese and let it melt. Sprinkle the shredded cheese evenly over the top of the skillet. Replace the lid and turn off the heat. Let it sit for 2–3 minutes — the residual heat will melt the cheese into a gorgeous, gooey layer across the top without overcooking anything underneath.
- Serve immediately. Scoop directly from the skillet into bowls or onto plates. Top with whatever your heart desires — sour cream, jalapeños, cilantro, avocado, a squeeze of lime. Tortilla chips on the side for scooping are highly encouraged.
Tips, Variations, and Make-Ahead Ideas
This skillet is endlessly adaptable. Here are the most useful tips I’ve gathered from years of making it on repeat — plus some variations that are genuinely worth trying.
Use a lid that actually fits
This sounds basic, but a loose or ill-fitting lid lets too much steam escape and the rice won’t cook evenly. If your skillet doesn’t have a lid, use a large baking sheet or a sheet of foil crimped tightly around the edges.

Don’t overcrowd with liquid — measure it
The liquid ratio matters in this recipe. The 1 ¾ cups of broth plus the liquid from the canned tomatoes is calibrated to cook 1 cup of long-grain white rice. If you add more vegetables or extra beans, add an extra ¼ cup of broth to compensate.
Make it spicier
Want more heat? Use a can of Rotel with extra hot green chiles, add a diced jalapeño with the onion, or stir in a teaspoon of chipotle chili powder with the seasoning. A few dashes of your favorite hot sauce stirred in at the end works great too.
Make it creamier
Stir in 2–3 tablespoons of cream cheese (cubed) along with the cheese at the end for a creamy, almost queso-like consistency. It sounds odd but it’s absolutely delicious and my kids lose their minds for it.
Swap the protein
Ground turkey, ground chicken, or even crumbled chorizo all work wonderfully in place of ground beef. If you use chorizo, cut back on the taco seasoning since chorizo is already heavily spiced.
Storage and reheating
Store leftovers in an airtight container in the refrigerator for up to 4 days. The rice continues to absorb liquid as it sits, so when reheating, add a splash of broth or water and stir before microwaving. It reheats beautifully and honestly the leftovers the next day are even more flavorful. If you’re into meal prep, this one pan taco rice meal prep guide has great portioning tips for packing it into lunch containers for the week.
Freezer-friendly
Yes! Let the skillet cool completely, then transfer to freezer-safe containers or zip-lock bags. Freeze for up to 2 months. Thaw overnight in the refrigerator and reheat on the stovetop over medium heat with a little broth to loosen it back up.
Make it a full taco bar
Serve this skillet alongside warm flour tortillas and let everyone build their own wraps at the table. It’s the best of both worlds — the ease of a one-pan dinner and the fun of taco night. My kids think it’s the most exciting dinner we have, and I’m not going to argue with that kind of enthusiasm. For another fun taco-night inspired dinner, you might also love my sheet pan taco stuffed bell peppers, which uses a lot of the same bold flavors in a different format.

Frequently Asked Questions About Weeknight Beef Taco Skillet
Can I use instant rice instead of regular long-grain white rice?
You can, but I’d really encourage you not to. Instant rice tends to get mushy and gummy when it simmers in seasoned liquid for any length of time, and it soaks up liquid so quickly that the timing changes significantly. If instant rice is all you have, reduce the broth to 1 cup and shorten the simmer time to about 5–8 minutes, watching carefully so it doesn’t dry out or turn to mush. Long-grain white rice genuinely gives you the best texture here.
My rice isn’t cooked through after 20 minutes — what did I go wrong?
A few things can cause this: the heat was too low so it never reached a proper simmer, the lid wasn’t sealing tightly enough, or your pan was too thin and wasn’t distributing heat evenly. Don’t panic — just add ¼ cup of warm broth, re-cover the pan, turn the heat up slightly to medium, and give it another 5 minutes. Check again and repeat if needed. It’ll get there.
Can I make this ahead of time for meal prep?
Absolutely — it’s one of the best meal prep dinners I know. Cook it fully, let it cool, and portion it into airtight containers. It keeps in the fridge for 4 days and reheats really well with just a splash of water or broth stirred in. The flavors actually deepen overnight, so day-two leftovers are ridiculously good. Just hold off on adding the toppings (sour cream, avocado, cilantro) until you’re ready to eat.
What’s the best skillet to use for this recipe?
A 12-inch cast iron skillet is my personal favorite — it holds heat incredibly well, which helps the rice cook evenly, and it goes from stovetop to table beautifully. A deep 12-inch nonstick skillet with a lid works just as well and is a little more forgiving if you’re worried about sticking. Whatever you use, make sure it’s deep enough to hold everything once the rice expands — you need at least 2–3 inches of depth.
How can I make this dairy-free?
Simply leave out the cheese or use your favorite dairy-free shredded cheese alternative — there are some really good melting options available at most grocery stores now. The rest of the recipe is naturally dairy-free as written. Top with sliced avocado and a drizzle of dairy-free sour cream, and you honestly won’t miss a thing. The base skillet is so flavorful on its own that the cheese is more of a bonus than a necessity.
This One’s a Keeper
If there’s one recipe I could hand to every busy parent, every college student, and every person who has ever stared into a nearly empty fridge at dinnertime — it’s this Weeknight Beef Taco Skillet. It’s the kind of recipe that doesn’t ask much from you and gives back so much in return. Thirty minutes, one pan, and a dinner that genuinely makes people happy. That’s the whole deal. No tricks, no fancy technique, just good honest food that tastes like effort even when it isn’t.
I hope you make this soon — and I really hope it becomes as much of a staple in your kitchen as it has been in mine. When you do make it, come back and leave a comment below to let me know how it went. Did you add jalapeños? Use turkey instead of beef? Make it spicy or creamy or both? I want to hear all of it. And if you’re saving this for later (which you absolutely should), pin it now so it’s there when a Tuesday night desperately needs saving.